
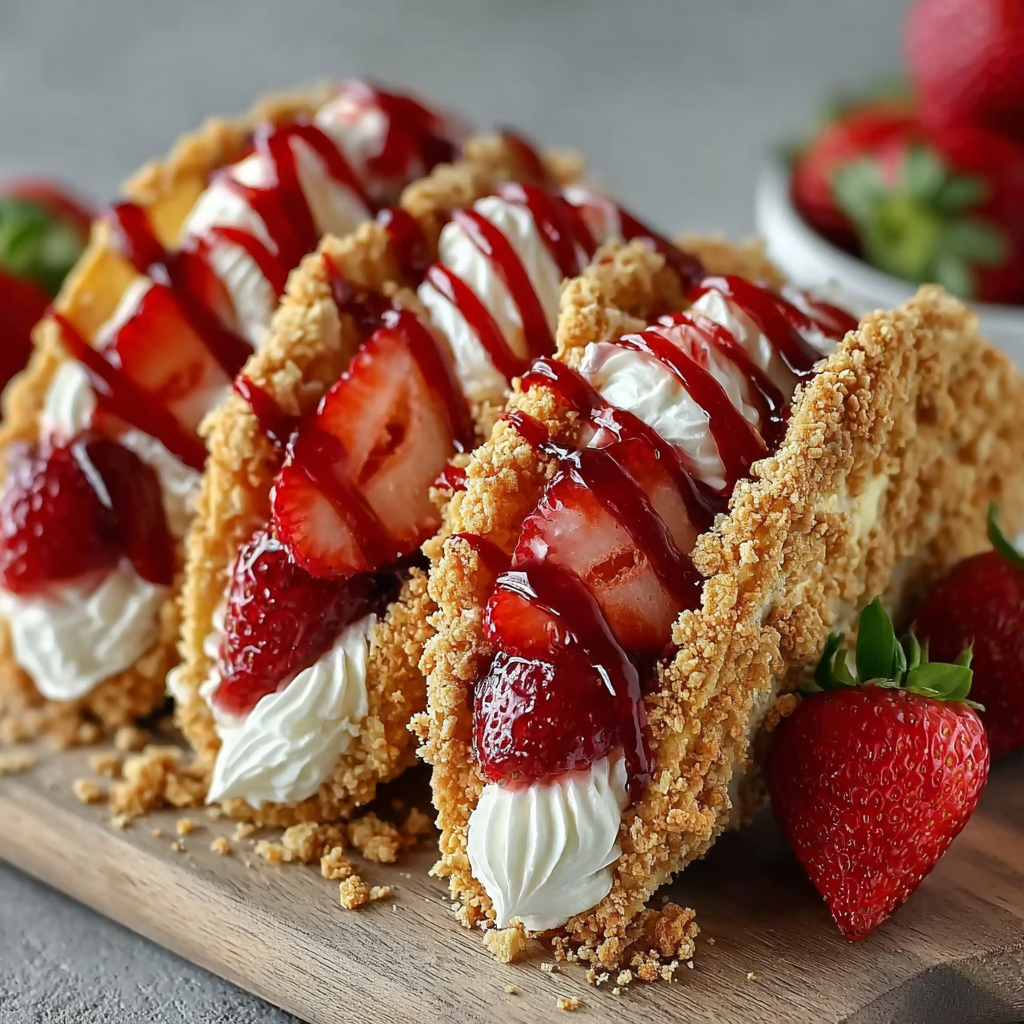
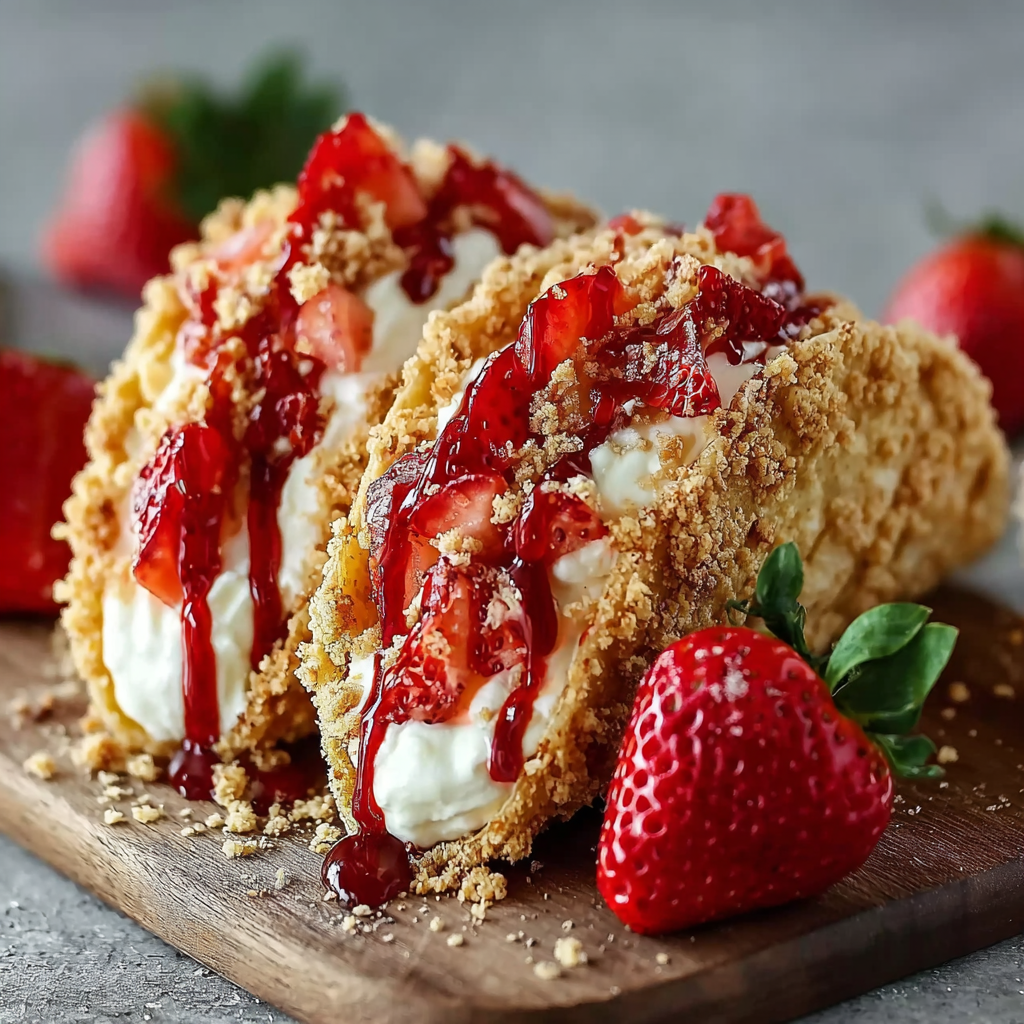
Strawberry Crunch Cheesecake Tacos

Crispy white chocolate–coated tortilla shells filled with a light, creamy cheesecake filling and piled high with fresh strawberries and strawberry syrup.
This dessert started as a playful experiment the first time I wanted cheesecake without the fuss of slicing — handheld, bright, and made for sharing. I discovered this combination during a summer backyard get-together when I had extra flour tortillas and a fridge full of strawberries; transforming the tortillas into crunchy taco shells and coating them in white chocolate made everything feel celebratory. The contrast between a crisp shell, the cool, whipped cheesecake filling, and juicy strawberries became an instant hit. Every bite gives you a creamy center and a sweet, crunchy rim that makes people smile.
I’ve made these for potlucks, birthday parties, and lazy weekend brunches. They travel well for short distances (kept chilled), and guests always remark on the bright strawberry flavor and the playful presentation. The shells hold up surprisingly well when coated in chocolate, and the whipped filling keeps the tacos light rather than dense. This version uses simple pantry staples and fresh berries to produce a dessert that looks impressive but is easy to assemble — perfect for home cooks who want a showstopper without hours in the kitchen.
Why You'll Love This Recipe
- Handheld dessert that tastes like classic cheesecake but can be eaten without a fork — perfect for parties and outdoor gatherings.
- Ready mostly within an hour when you bake shells and chill filling ahead; final assembly takes minutes.
- Uses common pantry items: flour tortillas, white chocolate, cream cheese, powdered sugar, and fresh strawberries.
- Make-ahead flexibility — shells and filling can be prepared a day ahead and assembled just before serving to keep shells crisp.
- Customizable: swap toppings, use dark chocolate, or add crushed cookies to the filling for a different texture profile.
I remember serving these at a summer brunch; my youngest cousin asked for three in a row, then declared them “the best thing ever.” Friends liked the novelty of a cheesecake they could pick up, and several asked for the recipe. The white chocolate and strawberry crunch give the taco edge a delightful snap that pairs perfectly with the silky filling, creating a texture contrast that wins over skeptical cheesecake lovers.
Ingredients
- For the taco shells: 5 large flour tortillas — look for soft, pliable tortillas that will crisp evenly; a brand like Mission or Guerrero works well. Using fresh, not stale, tortillas ensures even browning without cracking.
- Unsalted butter: 1 tablespoon, melted — a light brush helps the shells brown and helps the white chocolate adhere; clarify slightly if you're concerned about smoke point.
- White chocolate: 13 ounces (about one standard bag or 1 bag of good-quality chips or chopped candy) — use couverture or a high-quality bar (e.g., Callebaut, Ghirardelli) for a smooth, glossy set.
- Strawberry crunch topping: Store-bought crushed freeze-dried strawberries mixed with crispy rice cereal or homemade crushed freeze-dried strawberries for bright color and snap.
- Cream cheese: 8 ounces, softened to room temperature — full-fat cream cheese gives the creamiest texture; Philadelphia is a reliable choice.
- Powdered sugar: 1/2 cup, sifted — dissolves into the cream cheese for a silky sweetness; sift to avoid lumps.
- Vanilla extract: 1 teaspoon — pure vanilla provides warm, aromatic depth; substitute a splash of almond extract for a twist.
- Heavy whipping cream: 1 cup, very cold — whipping cold cream yields higher, more stable peaks that keep the filling light and airy.
- Topping: Fresh strawberries, sliced, and strawberry syrup or compote for additional sweetness and shine.
Instructions
Prepare the oven and tortillas: Preheat oven to 350°F (175°C). Using a 4-inch round cookie cutter or a sharp knife, cut 15 circles from the five large flour tortillas (three circles per tortilla). If you want extra crispness, prick each circle lightly with a fork to prevent large air pockets during baking. Brush and shape the shells: Brush each tortilla circle lightly with the melted unsalted butter on both sides; this encourages even browning and helps the chocolate stick. Drape the circles over an upside-down muffin tin so they form taco shapes between the cups. Work quickly so the butter doesn't soak through. Bake until golden: Bake for 5–6 minutes until the edges begin to turn golden brown and the centers are set but not dark. Watch closely after 4 minutes; ovens vary, and the shells can go from golden to overly brown fast. Let them cool in the muffin tin for 1 minute to set the shape, then transfer to a parchment-lined sheet to finish cooling. Melt the white chocolate: Chop or use chips for 13 ounces of white chocolate. Place in a microwave-safe bowl and heat in 30-second intervals, stirring between intervals until smooth. If the chocolate gets too thick, add a teaspoon of neutral oil to loosen it slightly. Alternatively, melt gently over a double boiler, stirring until glossy. Coat and add crunch: Working with cooled shells, brush or dip the inside of each shell with melted white chocolate. Immediately sprinkle the strawberry crunch mixture over the wet chocolate so it adheres before the coating sets. Place on parchment and let the chocolate harden completely at room temperature or briefly in the fridge. Make the filling: Beat 8 ounces of room-temperature cream cheese with 1/2 cup sifted powdered sugar and 1 teaspoon vanilla extract until smooth and free of lumps. In a separate chilled bowl, whip 1 cup cold heavy whipping cream to stiff peaks. Fold the whipped cream gently into the cream cheese base until fully combined and airy. Chill until ready to use. Assemble the tacos: Pipe the cheesecake filling into each chocolate-coated shell using a piping bag or a spoon. Top with fresh sliced strawberries and a drizzle of strawberry syrup or compote. Serve immediately for best contrast between crisp shell and creamy filling.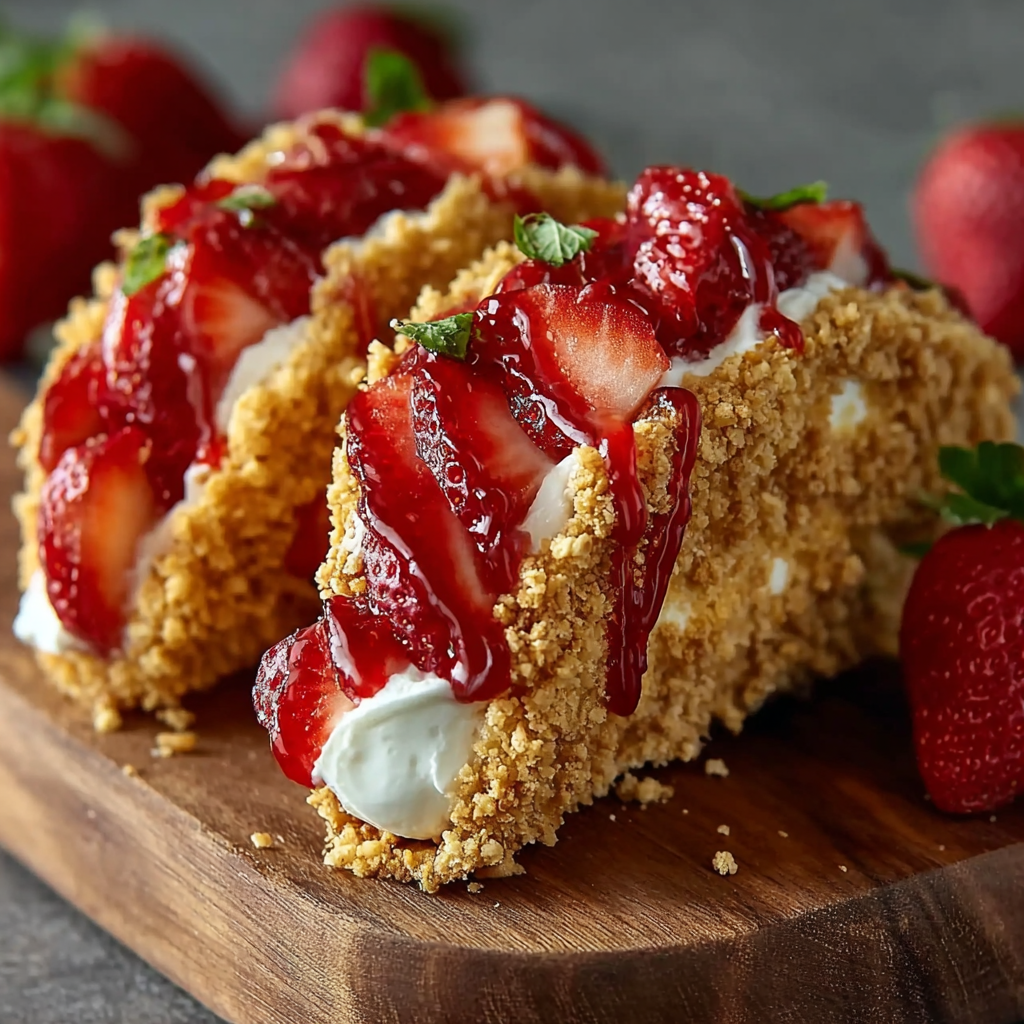
You Must Know
- The shells are best assembled just before serving; pre-coated shells can be stored in an airtight container for a day, but humidity will soften them over time.
- Make the filling a few hours ahead or the day before — chilling improves stability and flavor melding.
- Use very cold heavy cream for whipping; warm cream won’t hold peaks and the filling will be runny.
- White chocolate sets faster at room temperature; avoid placing shells in the freezer immediately to prevent condensation forming on the surface.
My favorite part is the crunch: the contrast of a glossy white chocolate rim and freeze-dried strawberry bits creates a satisfying texture. I once packed these for a picnic and the shells held up well for a couple of hours in a cooler; guests loved the novelty and the fresh berry brightness. I've learned that the better the white chocolate, the cleaner the snap and the prettier the finish.
Storage Tips
Store unassembled shells at room temperature in an airtight container for up to 2 days to maintain crispness; keep them away from moisture. The white chocolate coating speeds-safe storage if fully set. Refrigerate the cheesecake filling in a sealed container for up to 48 hours. Once filled, the tacos are best eaten within 24 hours — chilling assembled tacos will cause the shells to soften as the filling releases moisture. To re-crisp shells, you can briefly warm them in a 300°F oven for 3–4 minutes before filling, but avoid overheating if they are already coated with chocolate.
Ingredient Substitutions
If you need to adjust ingredients, try whole wheat or gluten-free large tortillas to change the base — note this will alter texture. Swap white chocolate for milk or dark chocolate for a richer edge; if using dark chocolate, add a teaspoon of corn syrup to the melted chocolate for a shinier finish. For a lighter filling, replace half the cream cheese with mascarpone or use Greek yogurt blended with a touch of honey, though this will be tangier and slightly looser. For a nutty element, fold in 2 tablespoons of finely chopped pistachios or crushed graham crackers into the coating.
Serving Suggestions
Serve these on a long platter with a drizzle of strawberry syrup and a scattering of extra freeze-dried strawberry crumbs for color. Pair with a cold sparkling rosé or a citrusy Moscato for a brunch crowd. For a family dessert, plate two tacos per person with a dollop of extra whipped cream and a mint sprig. They work well as individual portions for parties — arrange them upright in a shallow bowl lined with paper towels so they don’t topple during transport.
Cultural Background
Handheld twists on desserts have long been popular across cultures, from Italian cannoli to Mexican churros. These tacos blend the American love of cheesecake with the fun, portable format of a taco, reflecting a modern, cross-cultural approach to sweets. While not traditional in any single cuisine, the combination pays homage to the playful spirit of fusion cooking that borrows textures and formats to create something new — similar to how bakeries reinvent pie flavors in tart or hand-pie form.
Seasonal Adaptations
In summer, emphasize fresh, vine-ripened strawberries and keep the presentation bright. In cooler months, swap strawberries for roasted pears with cinnamon and use white chocolate spiced with a pinch of cardamom. Around the holidays, fold 1 teaspoon of orange zest into the filling and sprinkle the crunch topping with toasted chopped hazelnuts. The basic technique is adaptable: change the fruit and garnish to suit seasonal produce without altering the core steps.
Meal Prep Tips
To streamline assembly for an event, prepare the shells and chill them separately, then make the filling and transfer to a piping bag and keep it refrigerated. Store shells and filling in separate sealed containers; set up an assembly station with toppings in small bowls so you can fill tacos quickly just before serving. If transporting, keep shells upright and filling in a chilled cooler; assemble no more than 30–45 minutes before serving to maintain optimal crispness.
These handheld treats strike a balance between showy and simple: they’re easy to scale up for a crowd and flexible enough to let you experiment. I encourage you to try a version with dark chocolate and raspberries, or add a crunchy cookie crumb inside the filling for extra texture. Enjoy — and don’t be surprised if they become a new party favorite.
Pro Tips
Poke tortilla circles lightly with a fork before baking to prevent large air pockets.
Use room-temperature cream cheese to ensure a lump-free, silky filling.
Keep heavy cream and mixing bowl chilled for the best whipping results.
Work quickly when coating shells with chocolate so the crunch adheres before setting.
If shells soften, re-crisp them briefly in a 300°F oven for 3–4 minutes before filling.
This nourishing strawberry crunch cheesecake tacos recipe is sure to be a staple in your kitchen. Enjoy every moist, high protein slice — it is perfect for breakfast or as a wholesome snack any time.
FAQs about Recipes
Can I prepare these ahead of time?
Yes. You can make the shells and filling a day ahead; assemble shortly before serving to keep shells crisp.
How long do assembled tacos keep?
Store assembled tacos in an airtight container in the fridge for up to 24 hours, but shells will lose crispness over time.
Tags
Strawberry Crunch Cheesecake Tacos
This Strawberry Crunch Cheesecake Tacos recipe makes perfectly juicy, tender, and flavorful steak every time! Serve with potatoes and a side salad for an unforgettable dinner in under 30 minutes.
Ingredients
Taco Shells
Cheesecake Filling
Topping
Instructions
Preheat and cut tortillas
Preheat oven to 350°F (175°C). Using a 4-inch cookie cutter, cut 15 circles from 5 large flour tortillas. Lightly prick each circle with a fork to prevent air bubbles while baking.
Brush and shape shells
Brush each tortilla circle on both sides with 1 tablespoon melted unsalted butter. Drape the circles over an upside-down muffin tin to form taco shapes between the cups.
Bake until golden
Bake for 5–6 minutes until edges are golden brown and centers are set. Cool in the muffin tin for 1 minute, then transfer to a parchment-lined sheet to cool completely.
Melt white chocolate
Melt 13 ounces white chocolate in 30-second microwave intervals, stirring until smooth. Add a teaspoon of neutral oil if needed to loosen the chocolate for dipping.
Coat and add crunch
Brush or dip each cooled shell with melted white chocolate, then immediately sprinkle the strawberry crunch topping so it adheres before the chocolate sets. Allow to harden.
Make cheesecake filling
Beat 8 ounces softened cream cheese with 1/2 cup powdered sugar and 1 teaspoon vanilla until smooth. Whip 1 cup cold heavy cream to stiff peaks in a separate bowl and fold into the cream cheese mixture until light and airy. Chill.
Assemble and serve
Pipe or spoon the chilled filling into each shell, top with sliced fresh strawberries and a drizzle of strawberry syrup or compote. Serve immediately for best texture.
Last Step: Please leave a rating and comment letting us know how you liked this recipe! This helps our business to thrive and continue providing free, high-quality recipes for you.
Nutrition
Did You Make This?
Leave a comment & rating below or tag
@royalrecipe on social media!
Categories:
You might also like...
Honey Garlic Chicken Thighs
Tender, juicy bone-in chicken thighs glazed in a sticky sweet and savory honey garlic sauce that caramelizes in the oven for a weeknight dinner everyone will love.
Strawberry Crunch Cheesecake Tacos
Crispy white chocolate–coated tortilla shells filled with a light, creamy cheesecake filling and piled high with fresh strawberries and strawberry syrup.
Did You Make This?
Leave a comment & rating below or tag @royalrecipe on social media!
Rate This Recipe
Share This Recipe
Enjoyed this recipe? Share it with friends and family, and don't forget to leave a review!
Comments (1)
This recipe looks amazing! Can't wait to try it.
Comments are stored locally in your browser. Server comments are displayed alongside your local comments.

Hi, I'm Patricia!
30-Minute Meals!
Join to receive our email series which contains a round-up of some of our quick and easy family favorite recipes.